Coverage Analysis & Budgeting System
Complete step-by-step implementation guide for sponsors and site investigators.
User Roles & Responsibilities
Sponsor
The primary administrator of the study. The Sponsor initiates the entire workflow — from creating the protocol to driving the final budget agreement with each site.
- Register and log in via OTP-secured account
- Create and configure the study protocol document
- Upload procedures via Excel template or AI PDF extraction
- Share the protocol with one or multiple site investigators
- Review the coverage analysis submitted by each site
- Create a draft budget (custom or from a template)
- Share the draft budget with each Site Investigator
- Review site's budget actions and respond (Agree / Raise Request / Reject)
- Negotiate line items until full agreement is reached
- Access and download the final agreed budget
Site Investigator
The site-level participant who receives the protocol from the Sponsor, performs the coverage analysis, and negotiates the budget to reflect site-specific costs and requirements.
- Log in with investigator credentials to access the assigned site
- View all protocols that have been shared by the Sponsor
- Initiate and auto-generate the coverage analysis for a protocol
- Customize payer assignments (Sponsor / Insurance / No Payer) per procedure and visit
- Share the completed coverage analysis back to the Sponsor
- Receive and review the Sponsor's draft budget
- Create a site-specific budget (cloned from the Sponsor budget)
- Compare site budget vs. Sponsor budget side-by-side
- Take actions on each line item: Agree or Raise a Request
- Generate and download the final agreed budget document
| Step | Role | Action | Outcome |
|---|---|---|---|
| 1.1 | 👔 Sponsor | Register & log in (OTP) | Sponsor account activated |
| 1.2–1.3 | 👔 Sponsor | Create protocol + upload procedures | Protocol document ready |
| 1.4 | 👔 Sponsor | Share protocol with sites | Site Investigators receive invitation |
| 2.1 | 👨🔬 Investigator | Log in & view shared protocol | Protocol accessible to site |
| 2.2 | 👨🔬 Investigator | Create coverage analysis | Auto-generated procedures & visits table |
| 2.3 | 👨🔬 Investigator | Customize & share analysis | Payer assignments sent to Sponsor |
| 3 | 👔 Sponsor | Review analysis, create & share draft budget | Draft budget delivered to site |
| 4 | 👨🔬 Investigator | Create site budget, compare, take action | Budget actions submitted to Sponsor |
| 5 | 👔 Sponsor | Review actions, negotiate line items | All items agreed upon |
| 6 | ✅ Both | Generate & download final budget | Final budget ready for implementation |
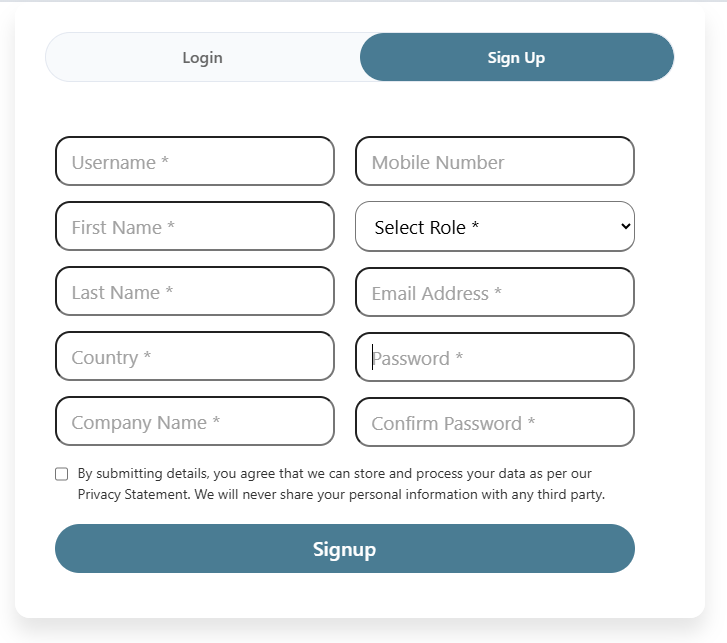
Sponsor Account Setup
User Registration Process
- 1 Sign up as a Sponsor user.
- 2 The signup process is based on data privacy. After agreeing to terms, you may proceed with signup.
- 3 This is an OTP-based signup process — a one-time passcode will be sent to your registered email/phone.
- 4 After signup is complete, log in as a Sponsor.
The signup process is OTP-based for enhanced security. Ensure you have access to the email/phone number provided during registration for verification purposes.
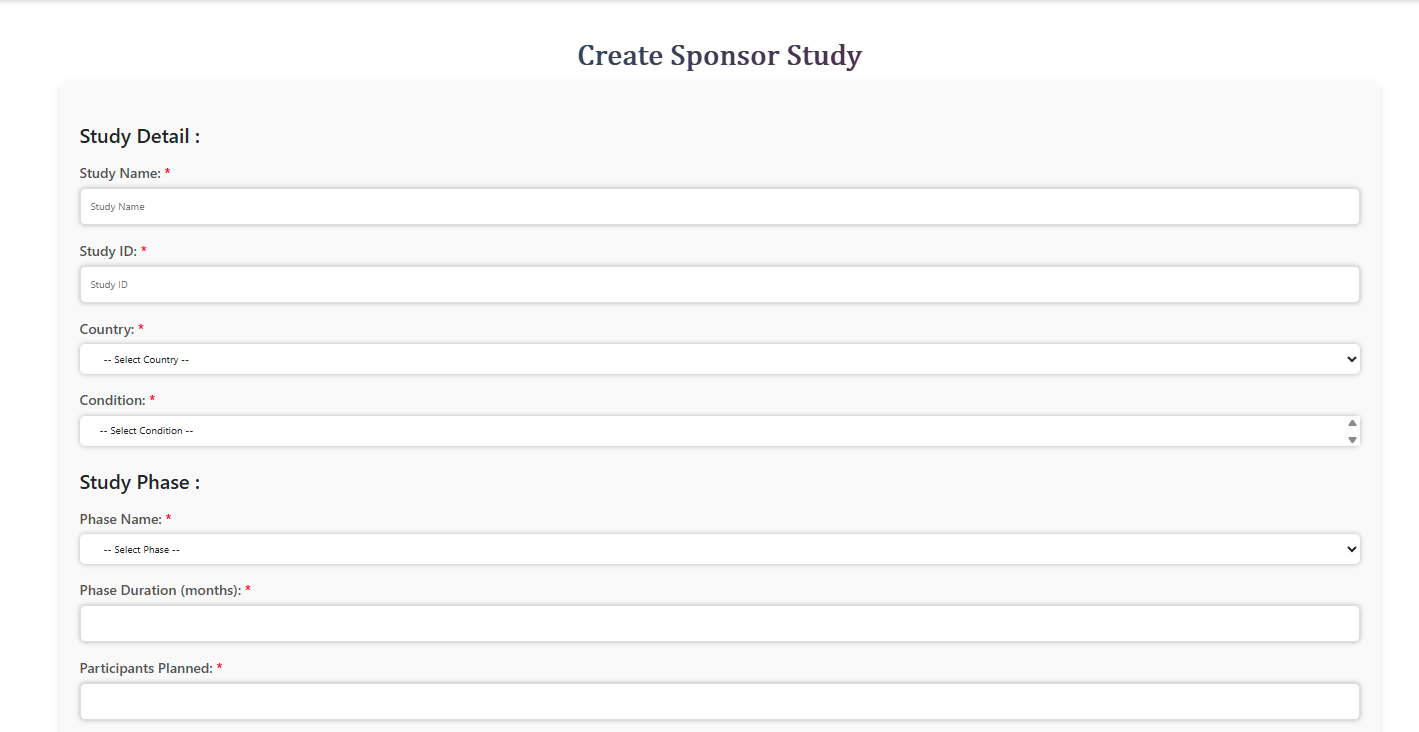
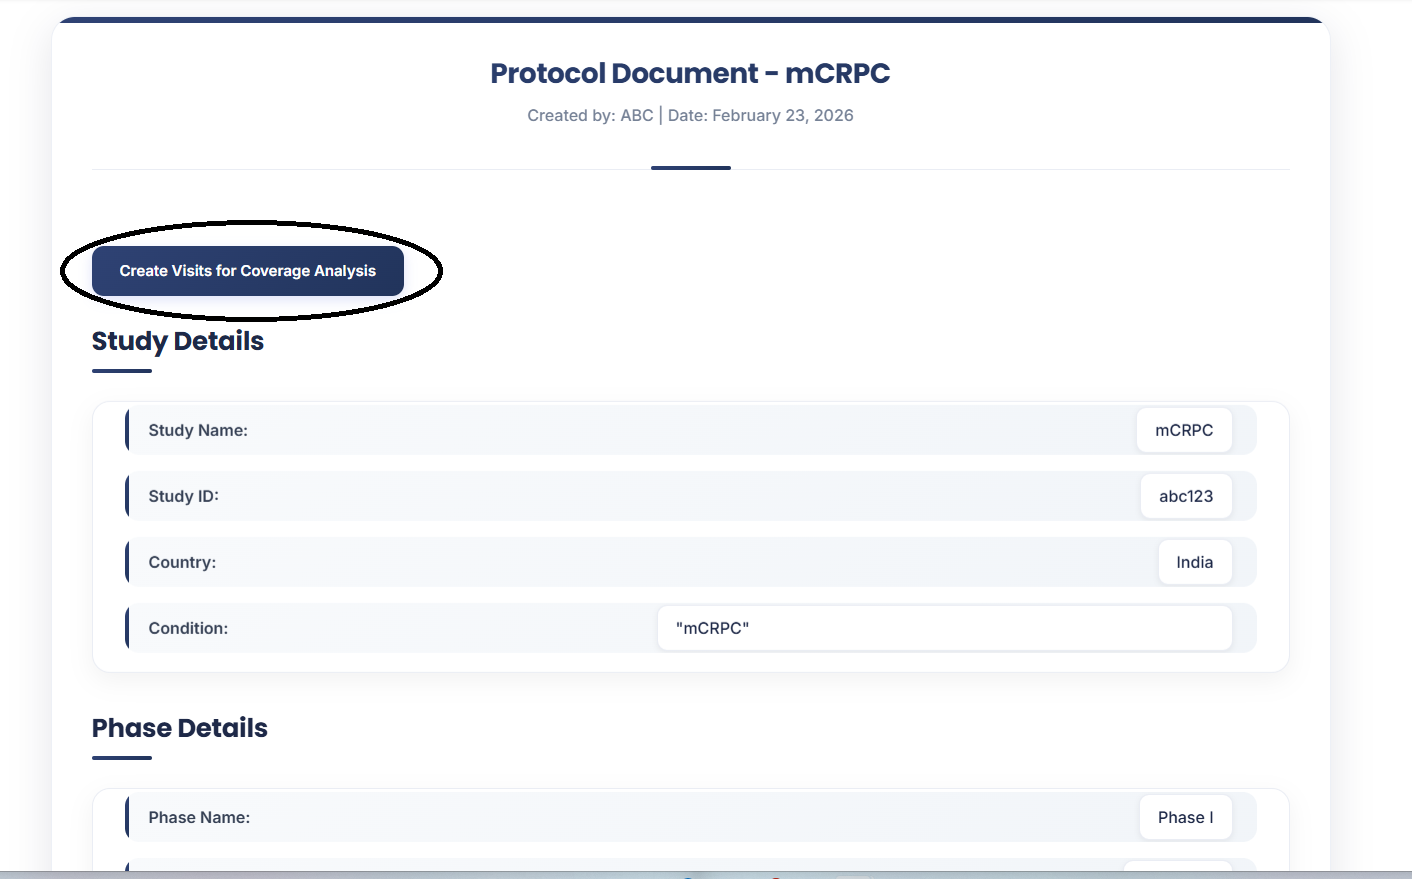
Protocol Creation
Creating a New Protocol
- 1 From the Sponsor home page, click "+Create New Protocol".
- 2 The Create Sponsor Study form will appear.
- 3 Fill in all required fields — especially Country and Condition.
.png)
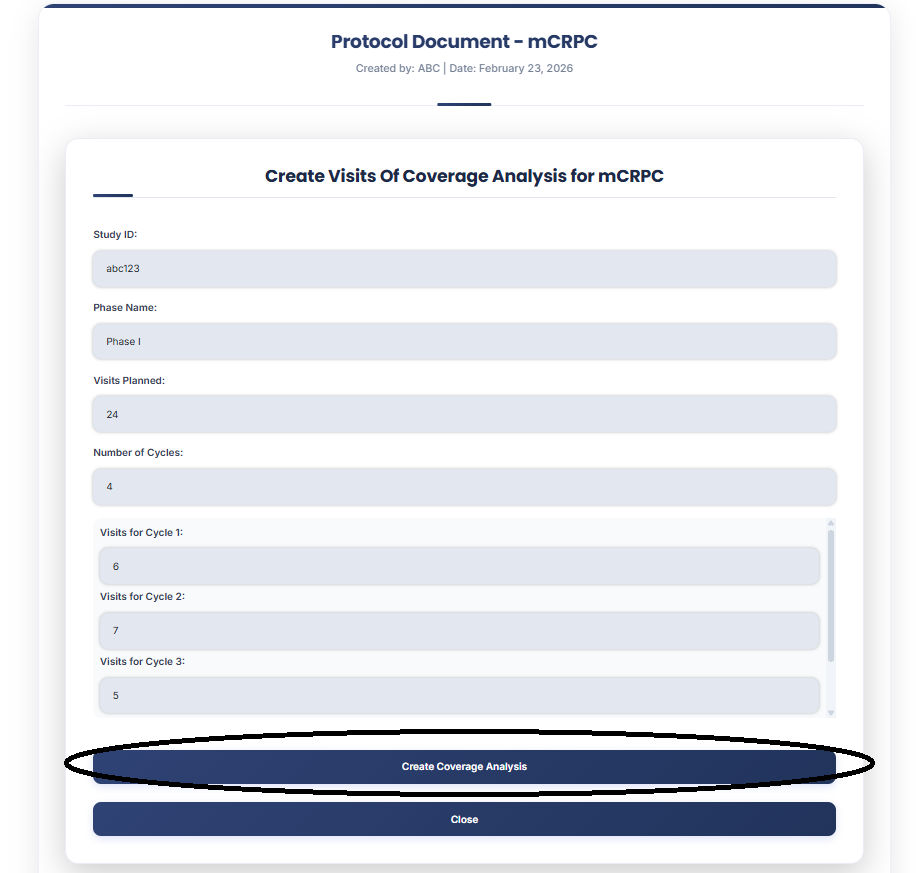
Planned Visit Configuration
Choose one of the following three options for visit planning:
Direct Total Count
Directly enter the total planned visit count.
.png)
Detailed Visit Planning
Enter visits per cycle. The system automatically calculates the total visits planned.
.png)
Upload Excel Sheet
Upload a visit-planned Excel sheet. Download the provided template as a reference — only the template format is accepted.


Procedure Upload
- 1 Upload the procedure Excel sheet using the same format as the visit planned file.
- 2 Only the approved template format is supported — other formats will not match correctly.
You may upload a PDF of the protocol document. The AI feature will automatically extract the required procedures from the PDF.
The Excel sheet used for visit planning must match the procedures in the PDF. Mismatches will prevent downstream processes from functioning correctly.
.png)
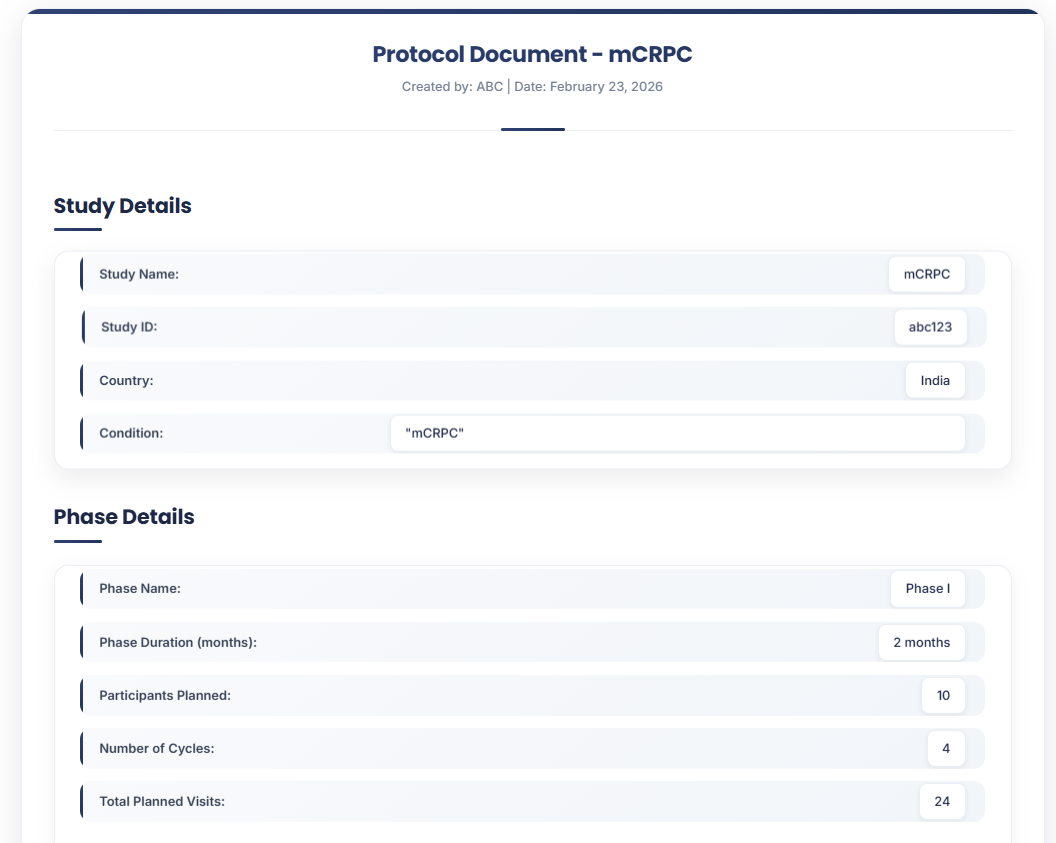
1.3 — After Creating the Protocol Document
- 1 After submitting the protocol form, you will be redirected to the Protocol Detail Page.
- 2 Review the details of the protocol you just created.
Share Protocol Documents
Sharing Process
- 1 Click the Share button on the Protocol Detail Page.
- 2 Three options will be presented:

Available Sites
Sites already registered in the system. You can share with multiple sites simultaneously.
.png)
Recommended Sites
- 1 AI-based site recommendations. Select multiple sites and multiple locations per site.
- 2 When you navigate to the Recommended Sites section, you will see a list of suggested sites. Each site may include one or multiple locations, and each location may have one or more associated contact persons.
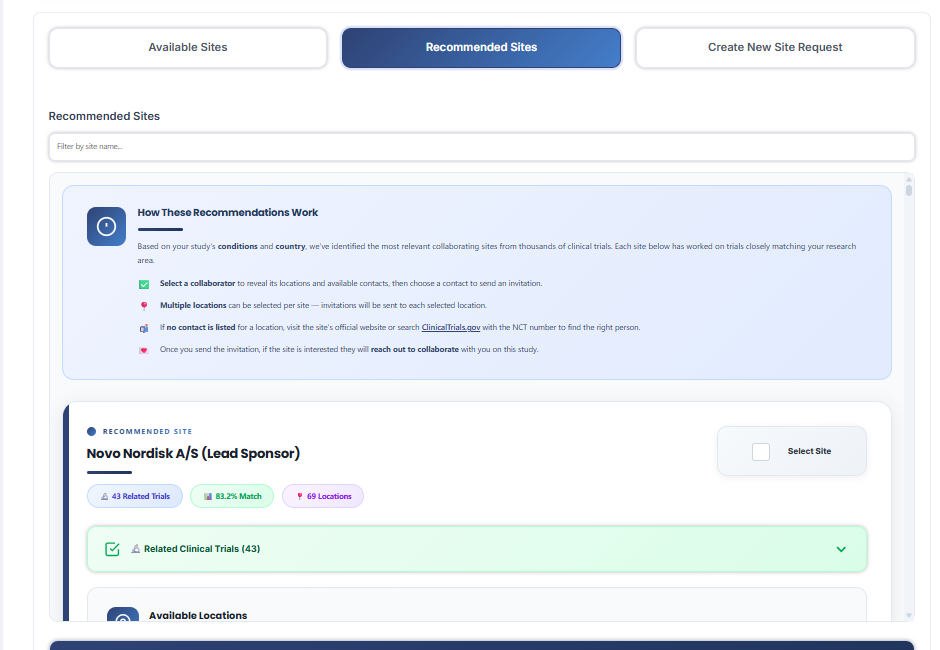
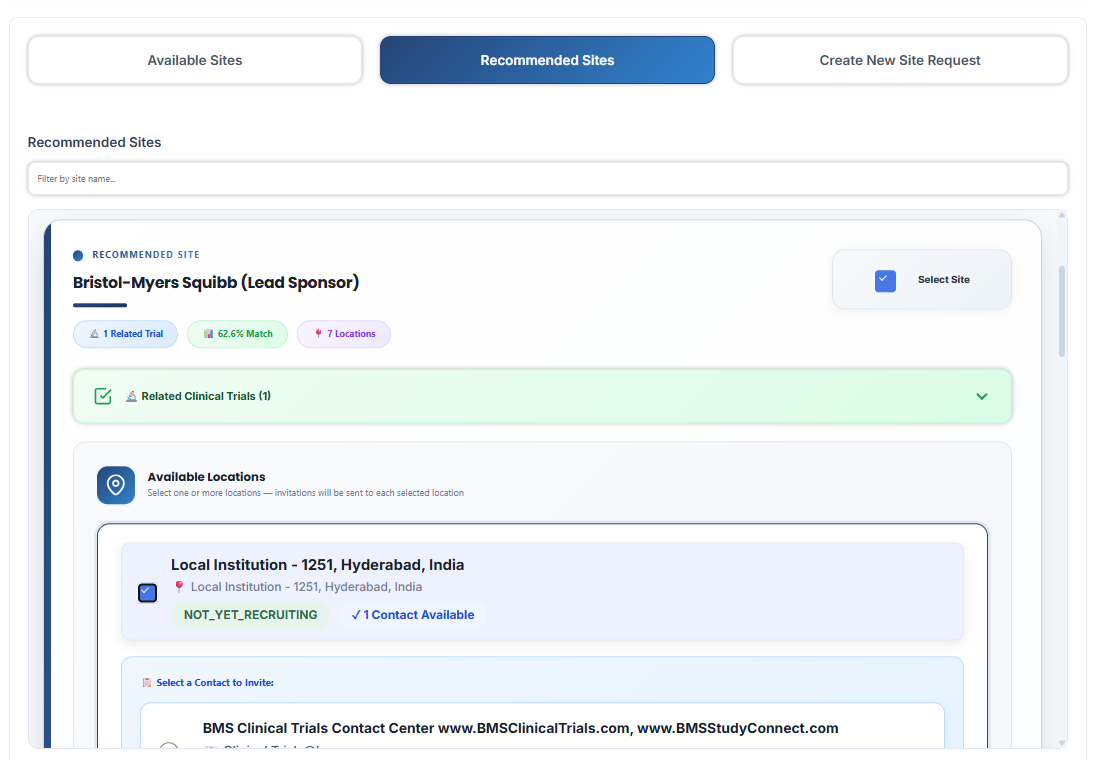
- 3 If contact details are not available for a selected location, you can manually add the required contact information by referring to sources such as Google, the site's official website, or ClinicalTrials.gov.
- 4 You can then select one or more sites, along with their respective locations, and assign at least one contact person for each.
- 5 Once you click Submit, an invitation email will be sent to the selected site(s) for review and potential participation.
- 6 If the selected site already exists in our system, the protocol document will be automatically shared with that site. The site will receive an email notification informing them that the protocol has been shared for their review.
.png)
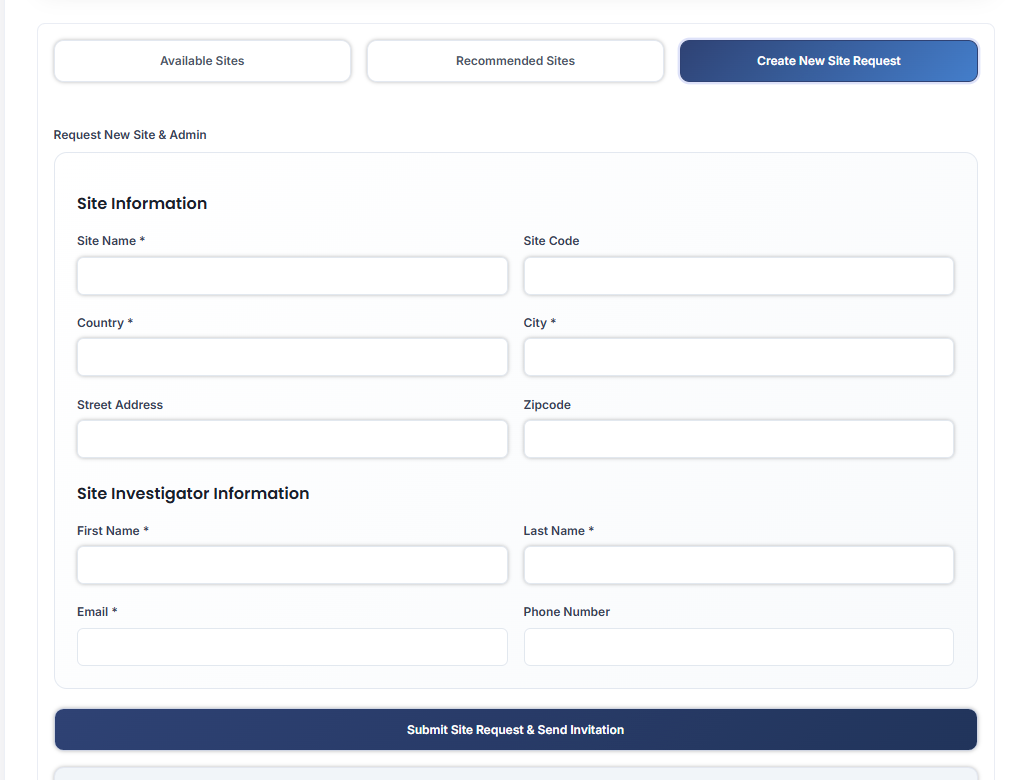
Create New Site
Create a new site entry directly from the sharing screen.
- 3 After sharing, you will be returned to the Sponsor home page.
Site Investigator Login & Protocol Access
Access Assigned Protocols
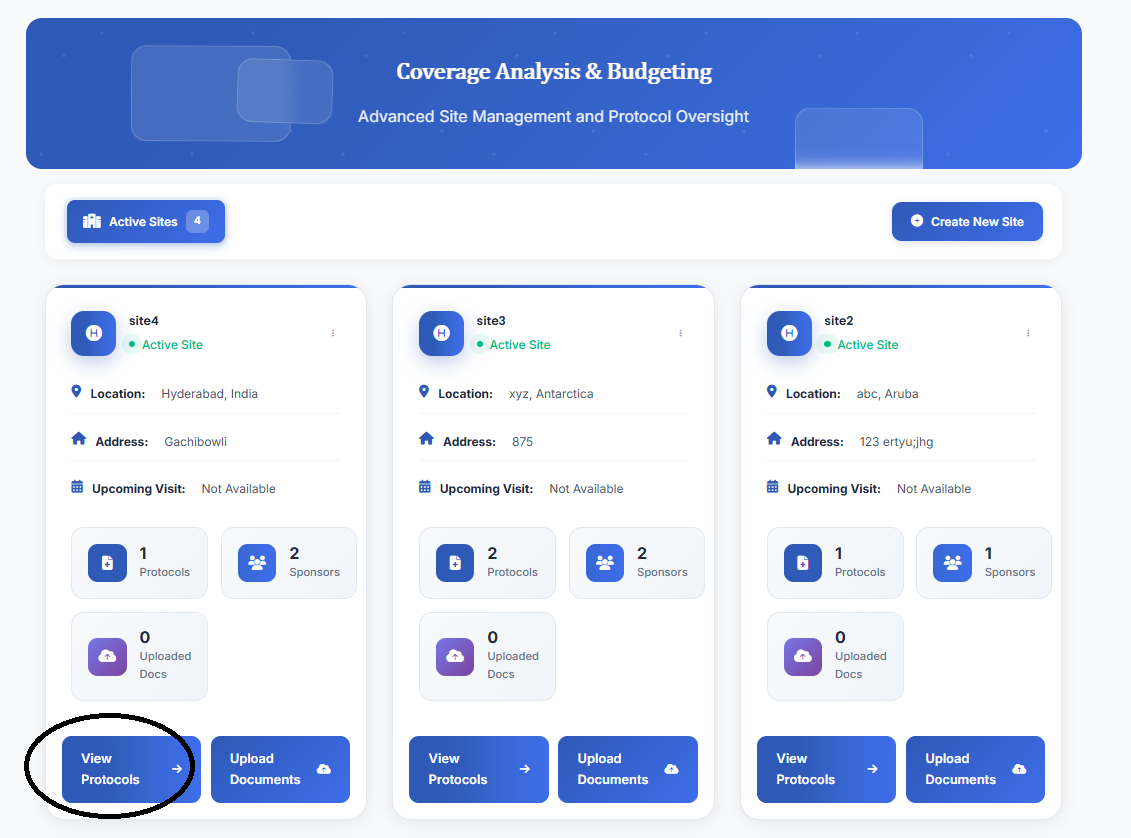
- 1 Log in with your investigator credentials to access your assigned site.
- 2 Click "View All Protocols".
- 3 All shared protocols will be listed.
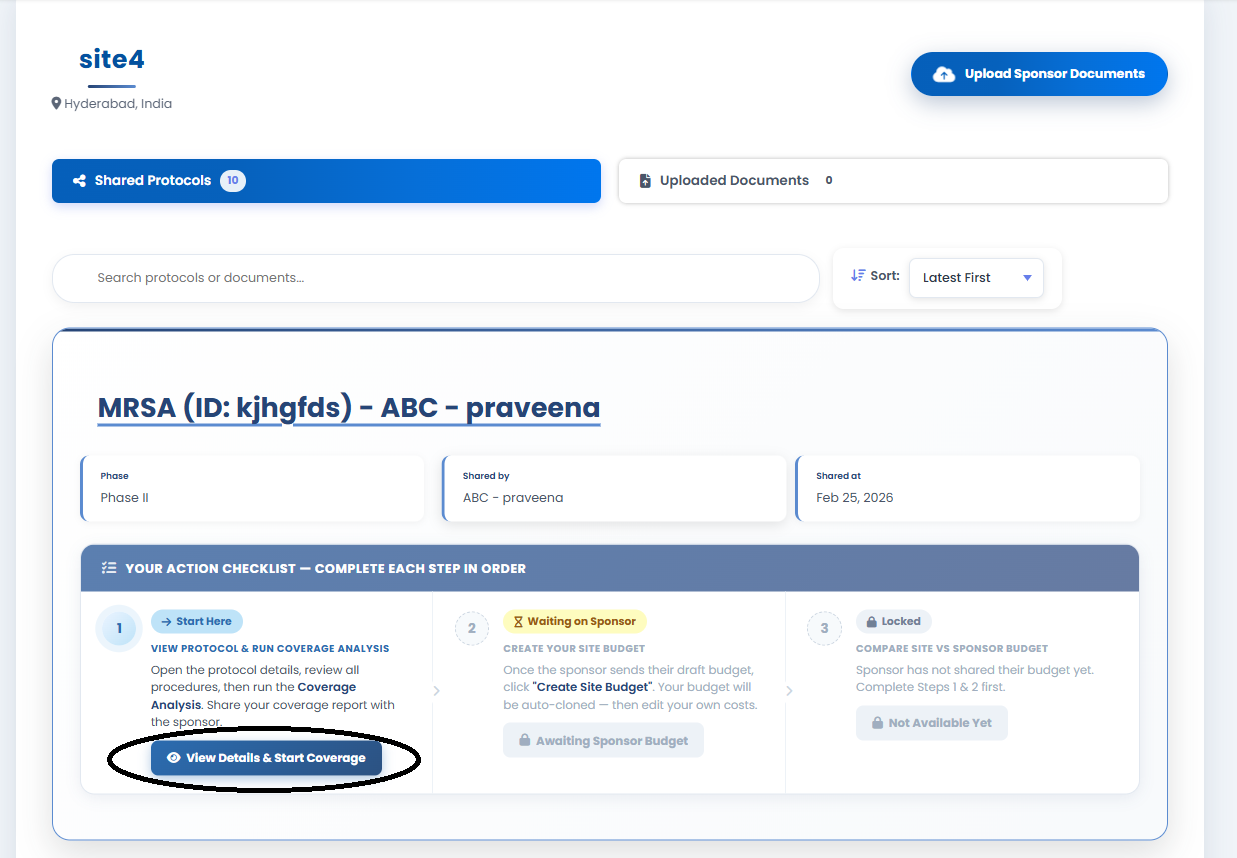
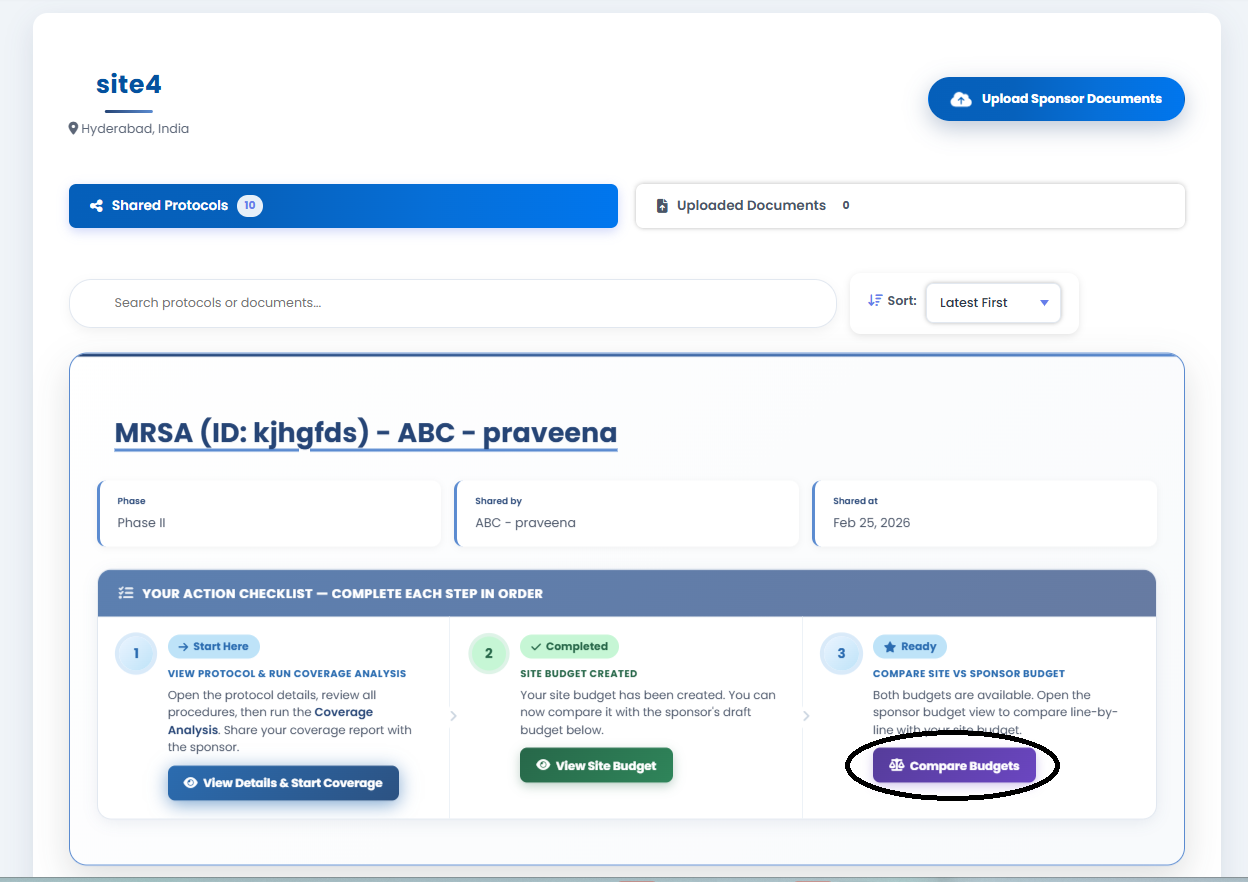
- 4 Click "View Details & Start Coverage" for the relevant protocol.
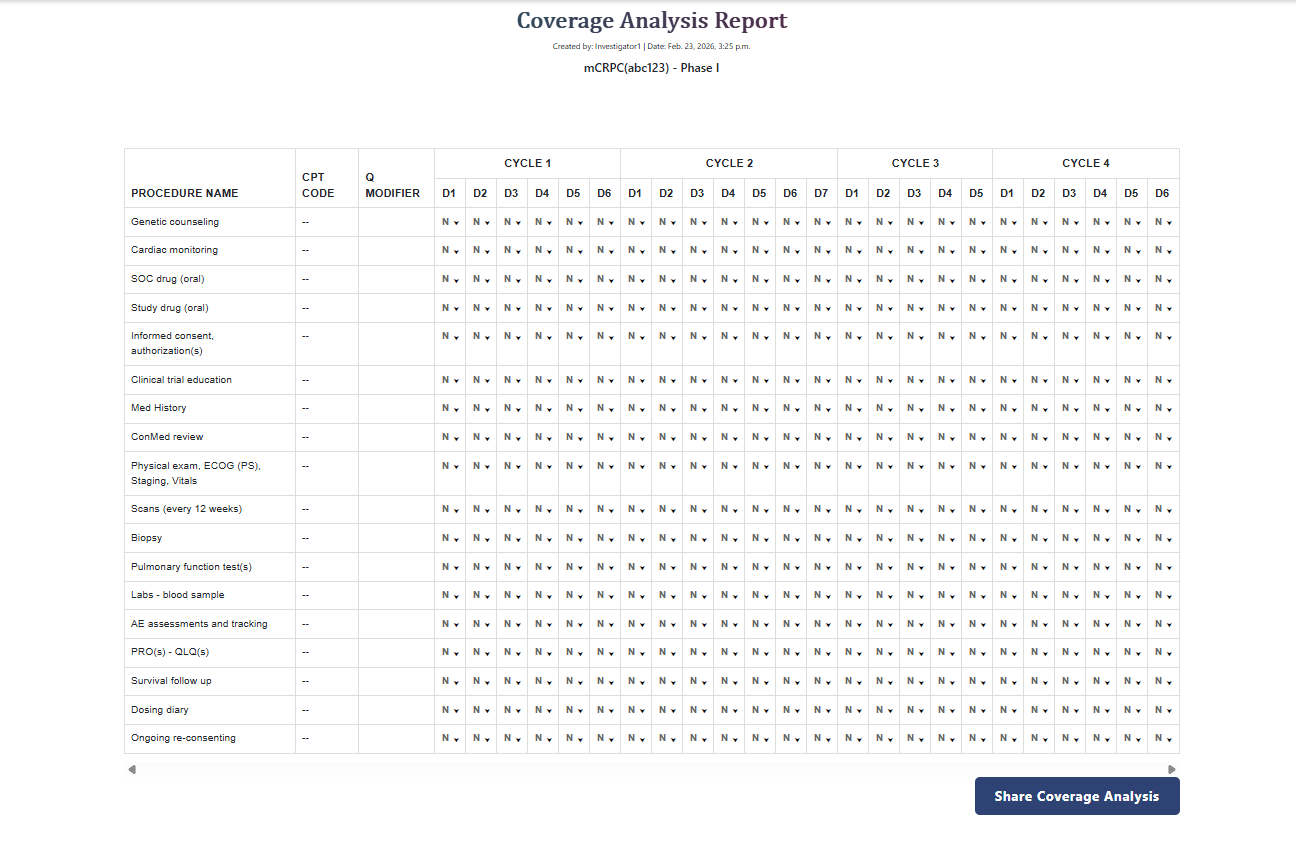
Create Coverage Analysis
Automatic Coverage Analysis Creation
- 1 Click "Create Coverage Analysis".
- 2 The system automatically generates a table of procedures and planned visits — based on total visit count, detailed visit plan, or the uploaded Excel sheet.
- 3 By default, the sponsor is set as the payer for all procedures.
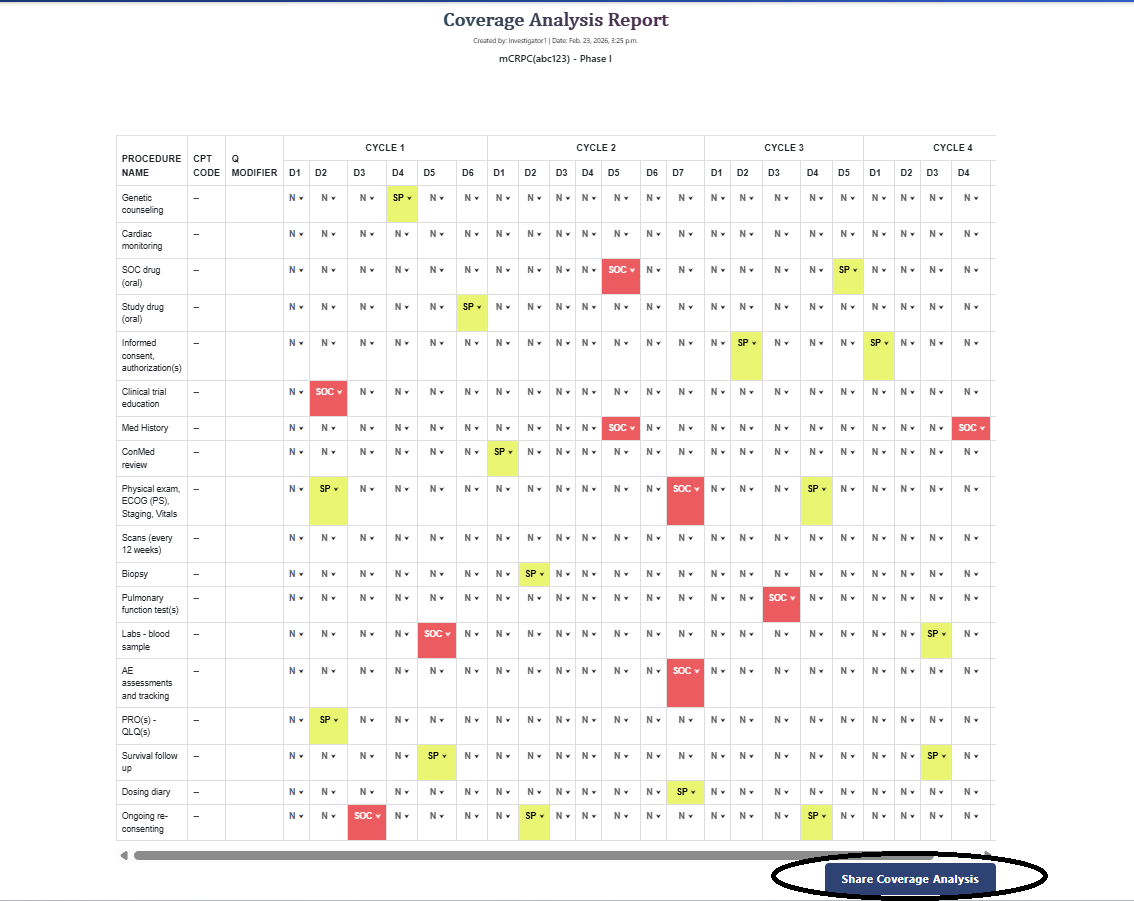
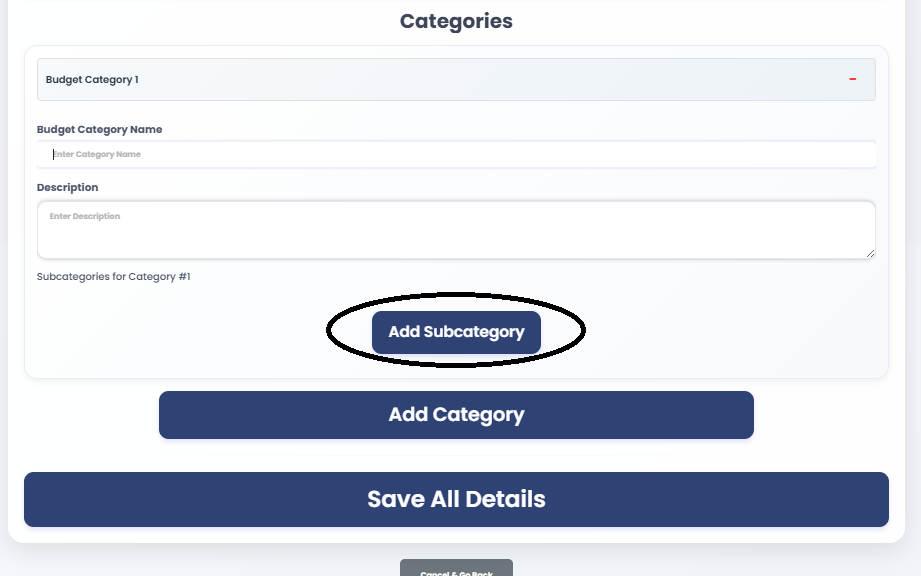
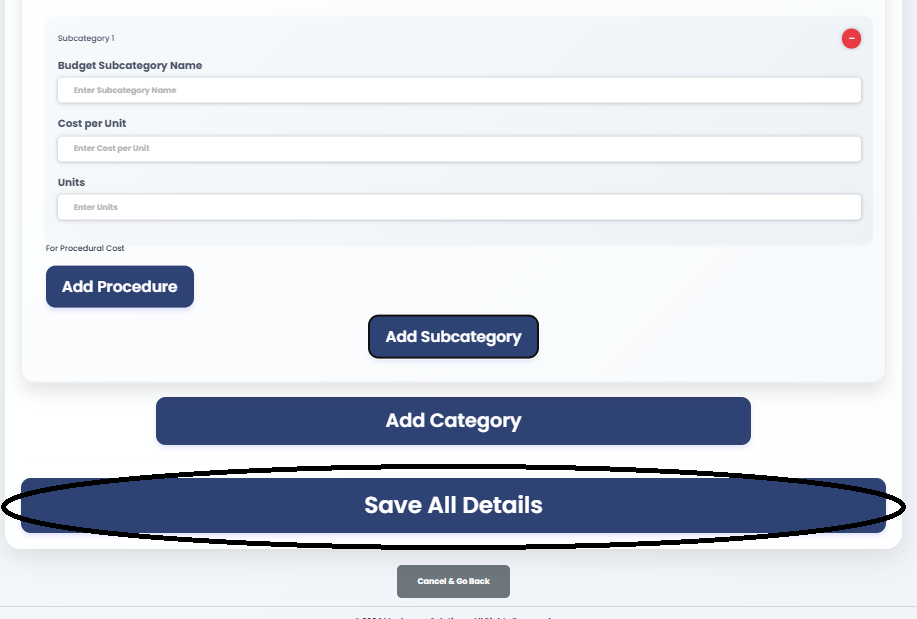
Customize Coverage Analysis
Edit & Customize
- 1 Edit the coverage analysis according to the validated document.
- 2 For each procedure and visit combination, designate the payer: Sponsor, Insurance, or No Payer.
- 3 Once customization is complete, share the coverage analysis back to the Sponsor.
 STEP 2.3 Customizing payer per procedure & visit, then sharing to sponsor
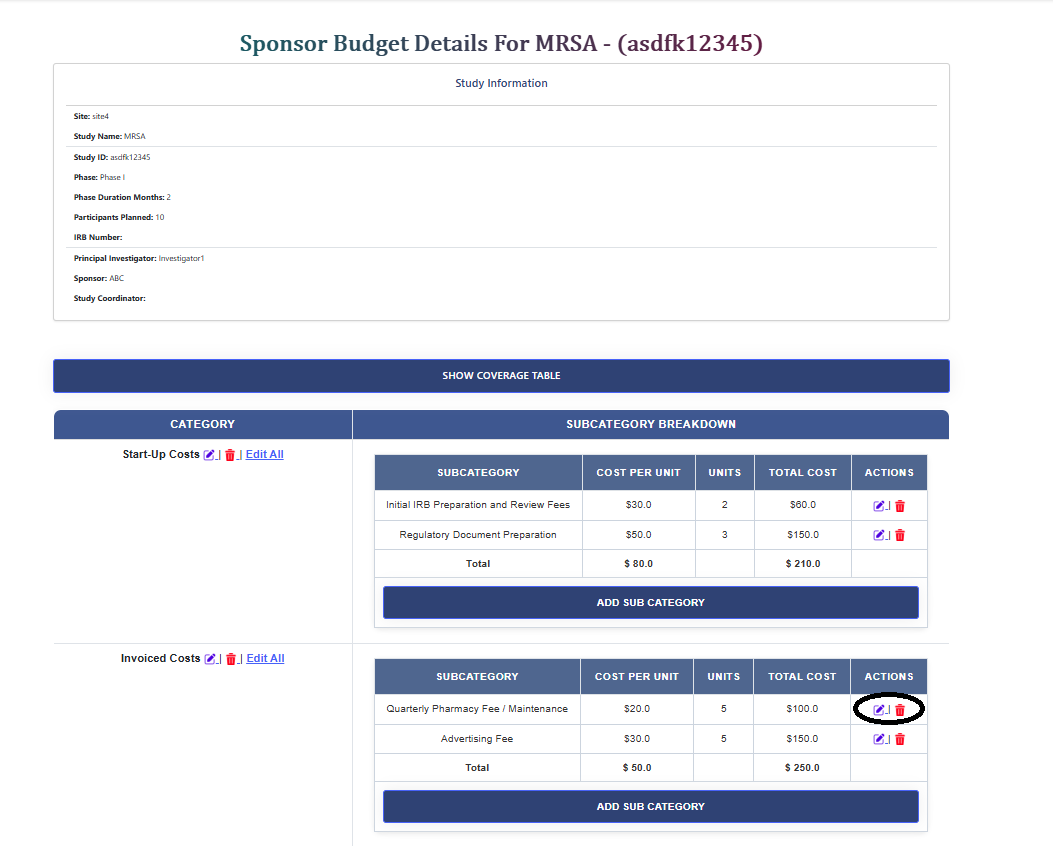
Sponsor Budget Workflow
View Shared Coverage Analysis
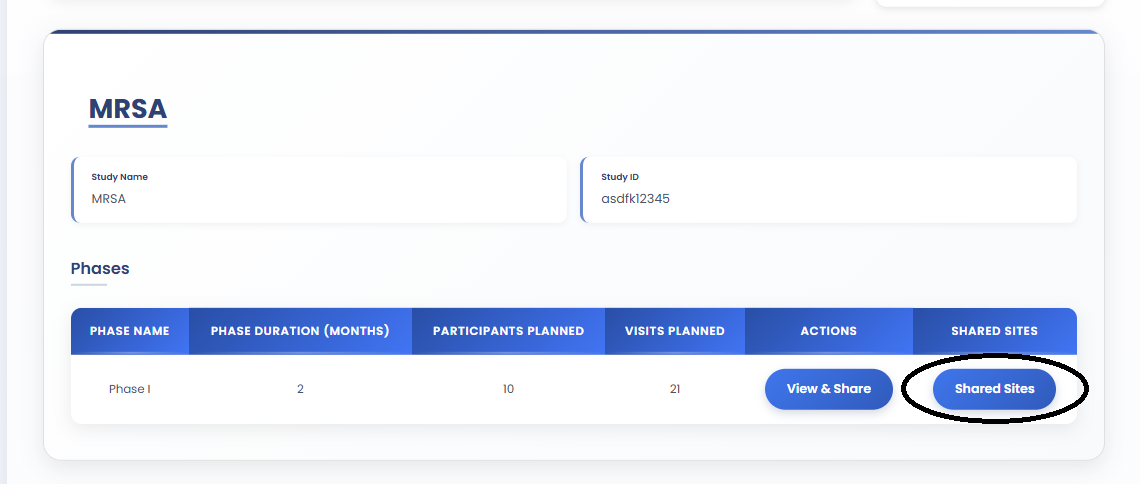
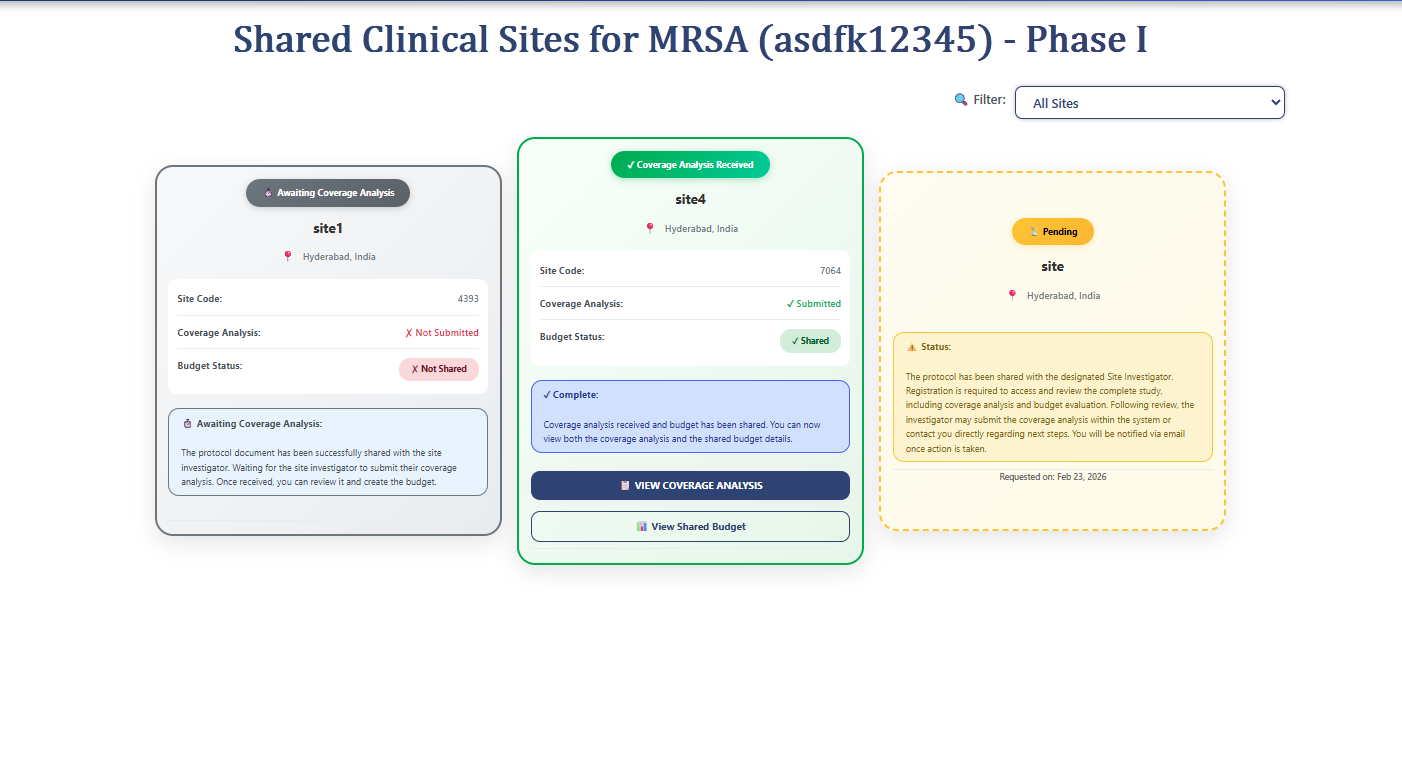
- 1 Log in as Sponsor and click "Shared Sites".
- 2 All sites shared for this protocol document are listed.
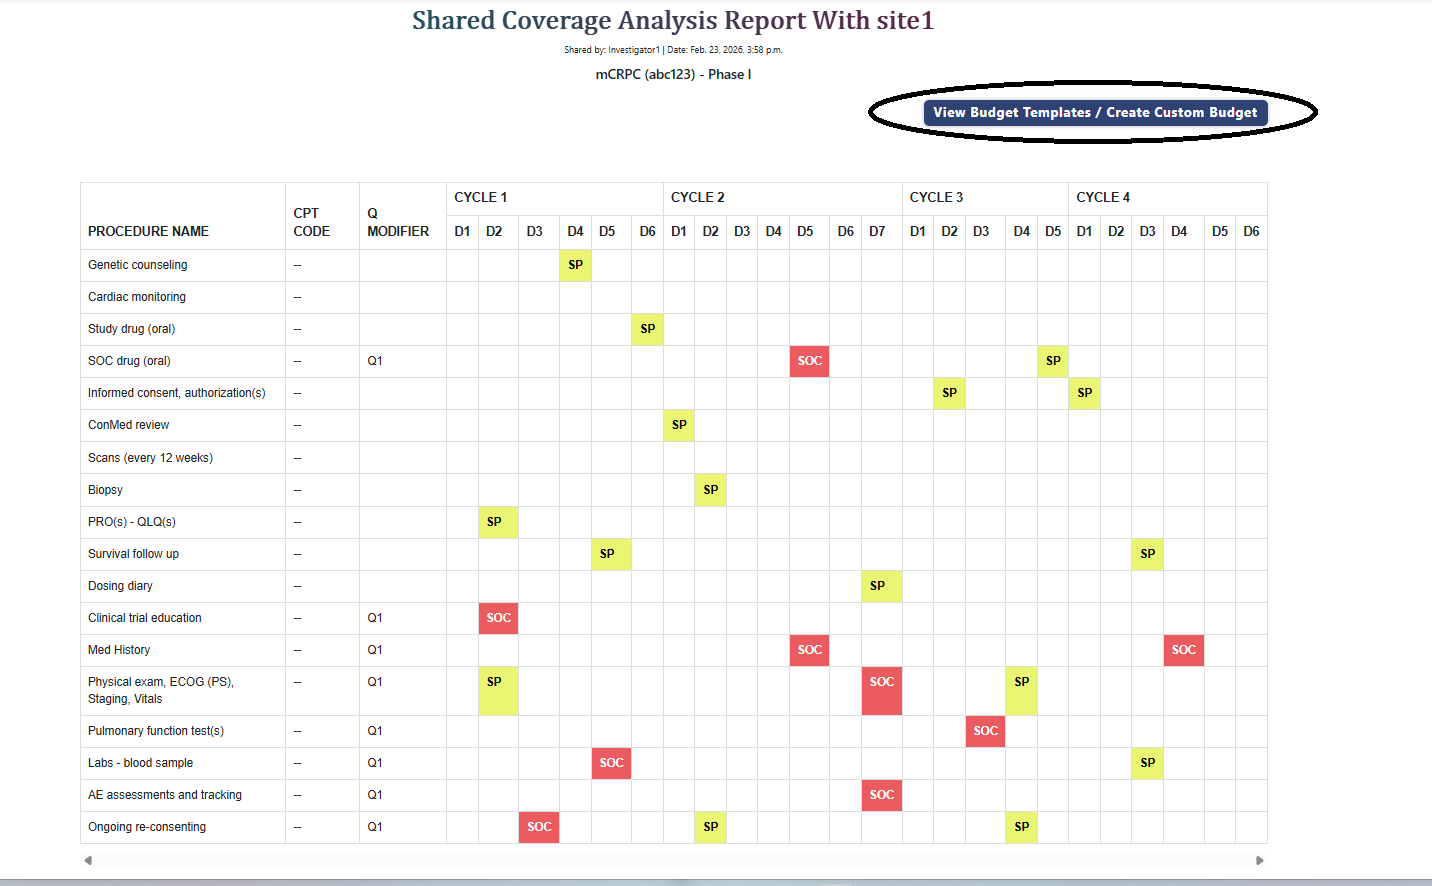
- 3 Click "View Shared Coverage Analysis".
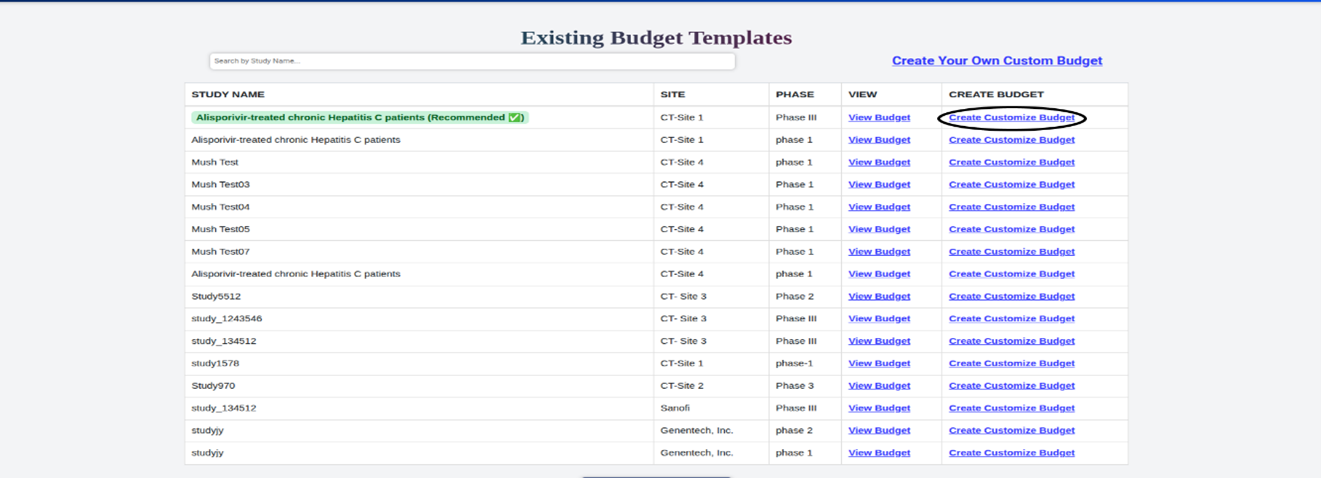
- 4 Click "View Budget Templates / Create Custom Budget".
Budget Creation Options
Create Custom Budget
Manually fill in each and every budget line item from scratch.

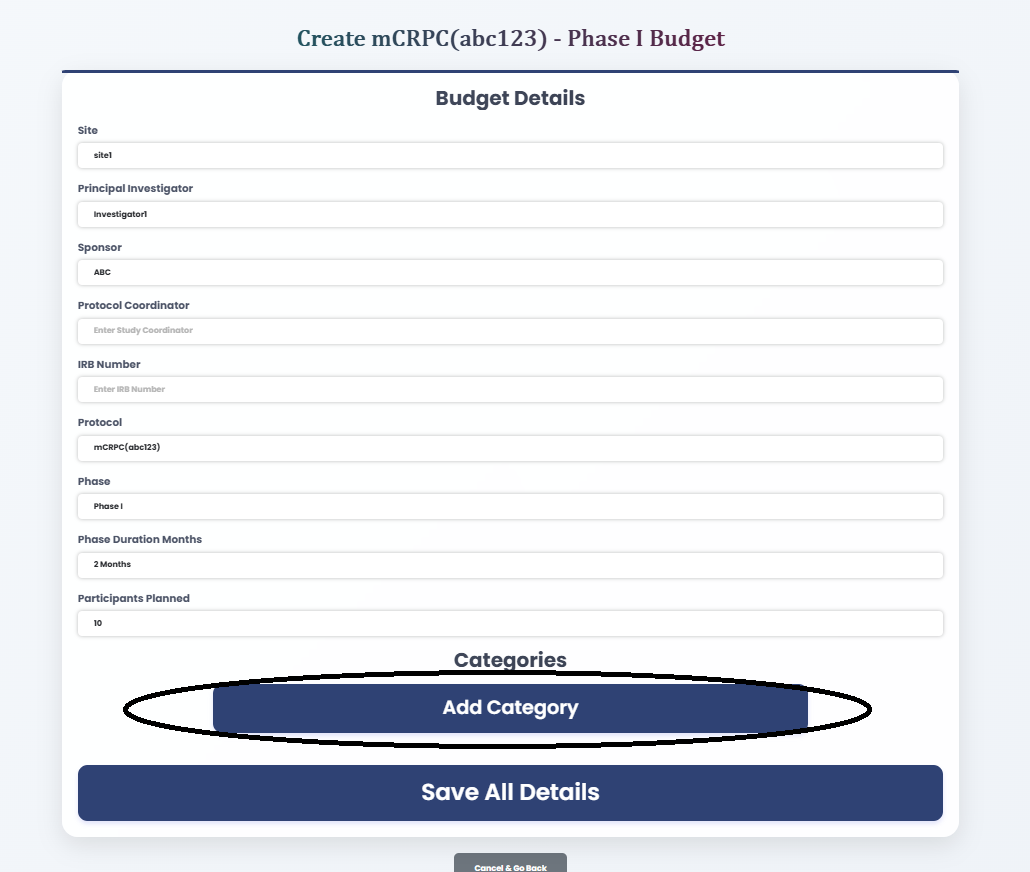
Template Budget
Click "Create Customized Budget" from a template. The system generates the budget automatically.
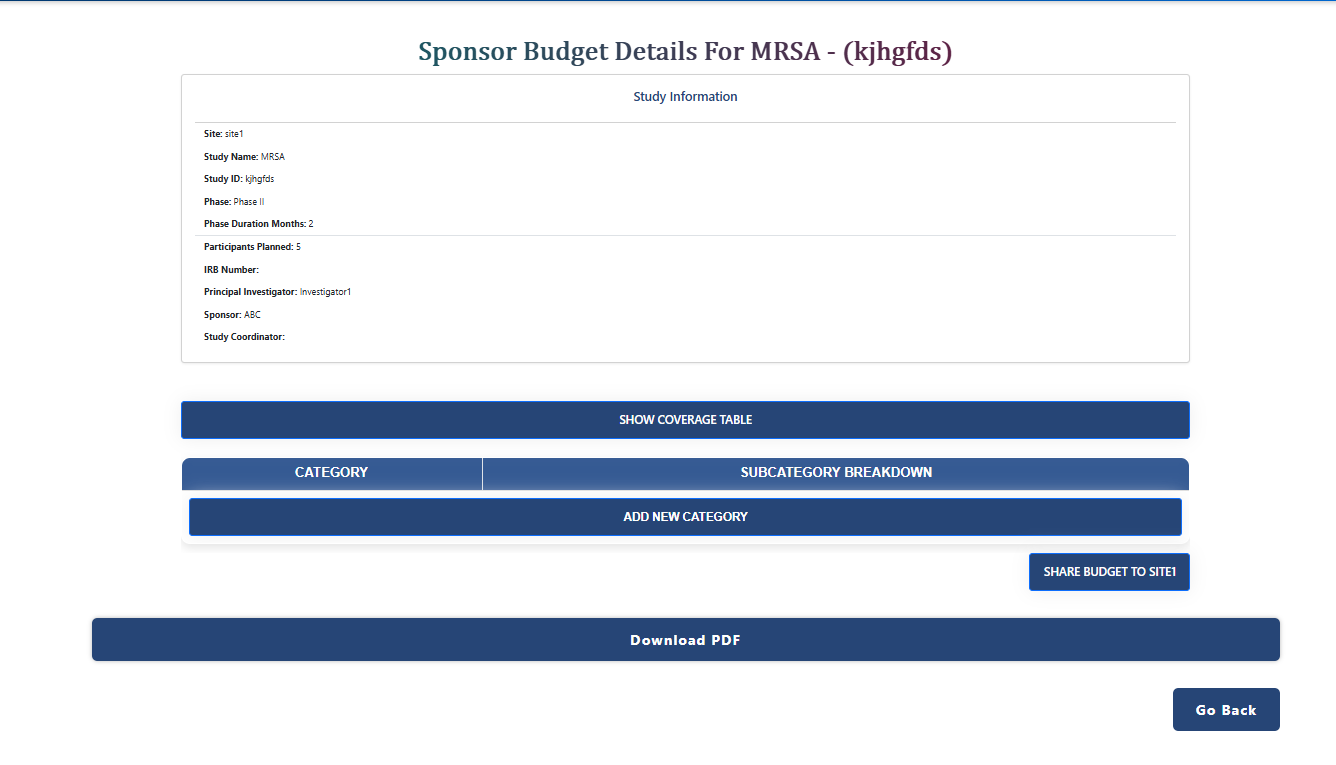
Budget Review & Draft Creation
- 1 Review each and every budget line item carefully.
- 2 Customize prices according to your requirements.
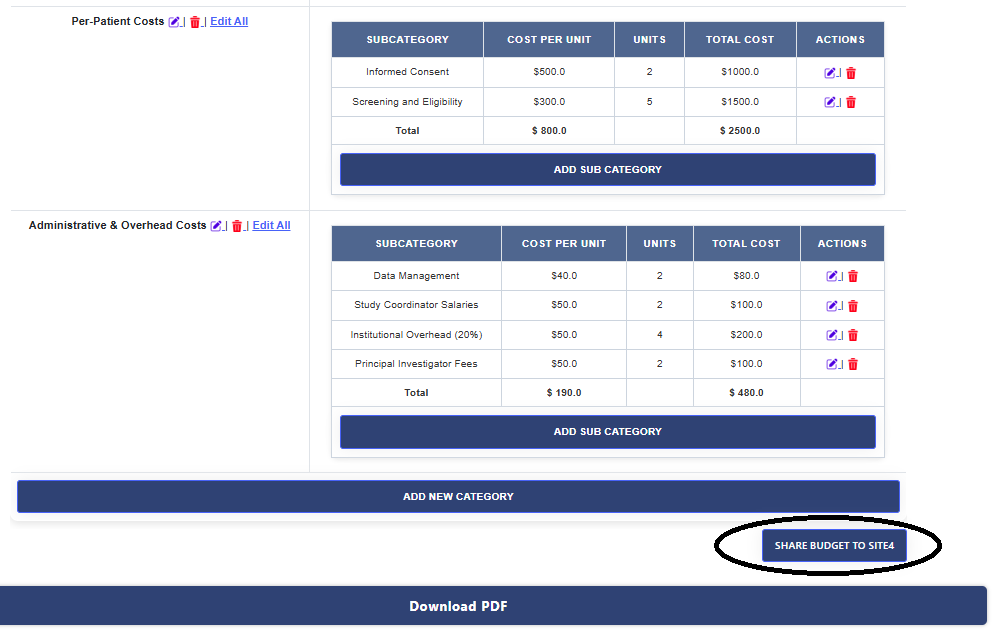
- 3 Create the Draft Budget.
- 4 Share the draft budget with the Site Investigator.
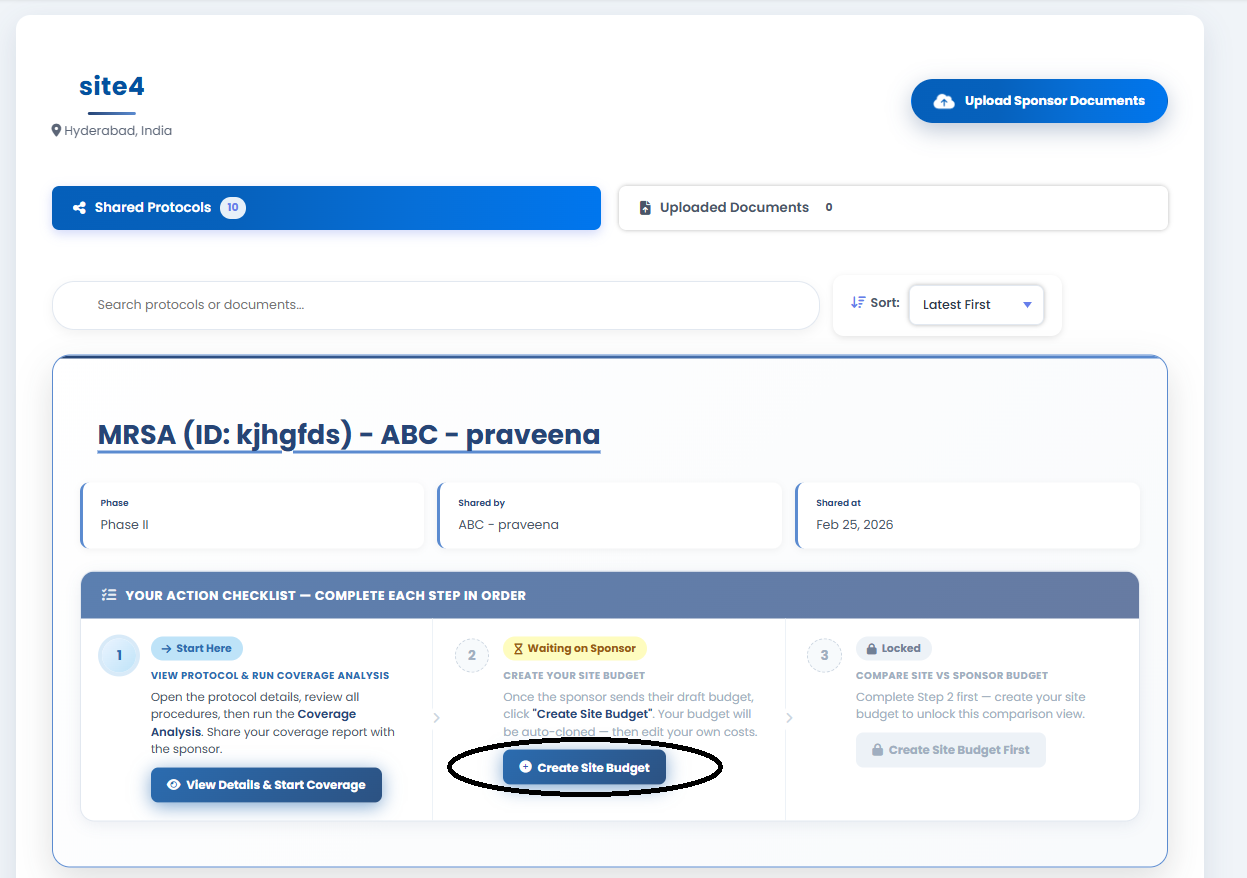
Site Investigator Budget Workflow
Create Site Budget
- 1 Log in as Investigator and click "View All Protocols".
- 2 Review the current status of the site budget and sponsor budget.
- 3 Click "Create Site Budget" — this clones the sponsor budget as the starting point.
- 4 Customize line items to reflect site-specific pricing.
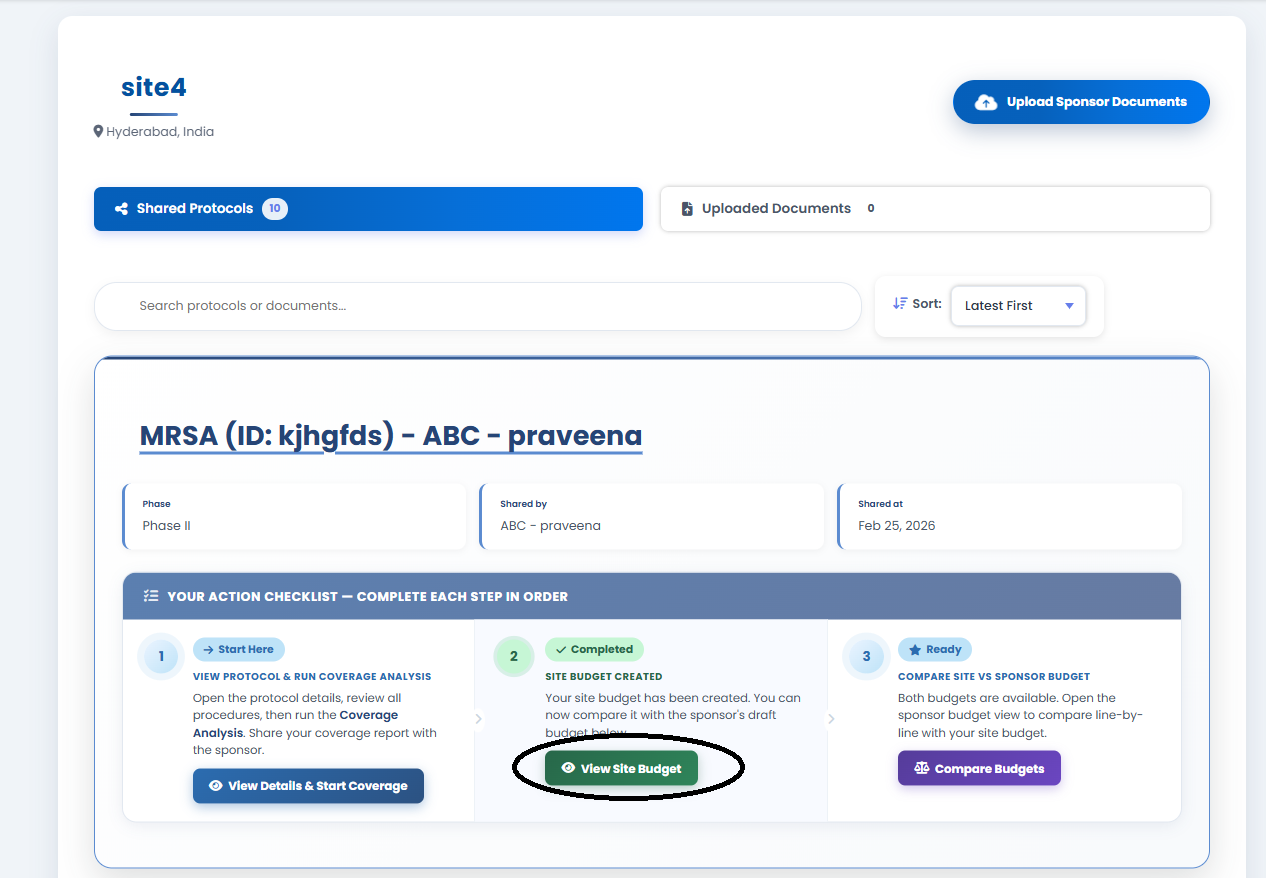
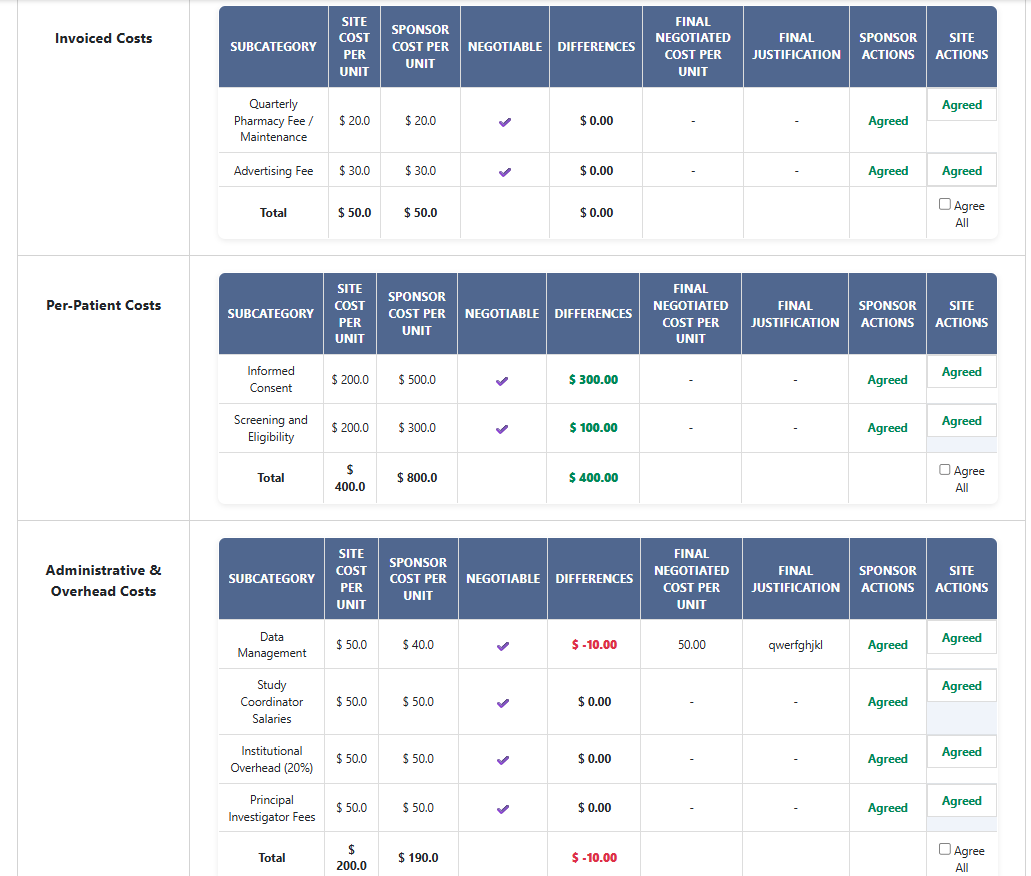
View site budget & Compare it with Sponsor Budget
- 1 Click "View Site Budget".
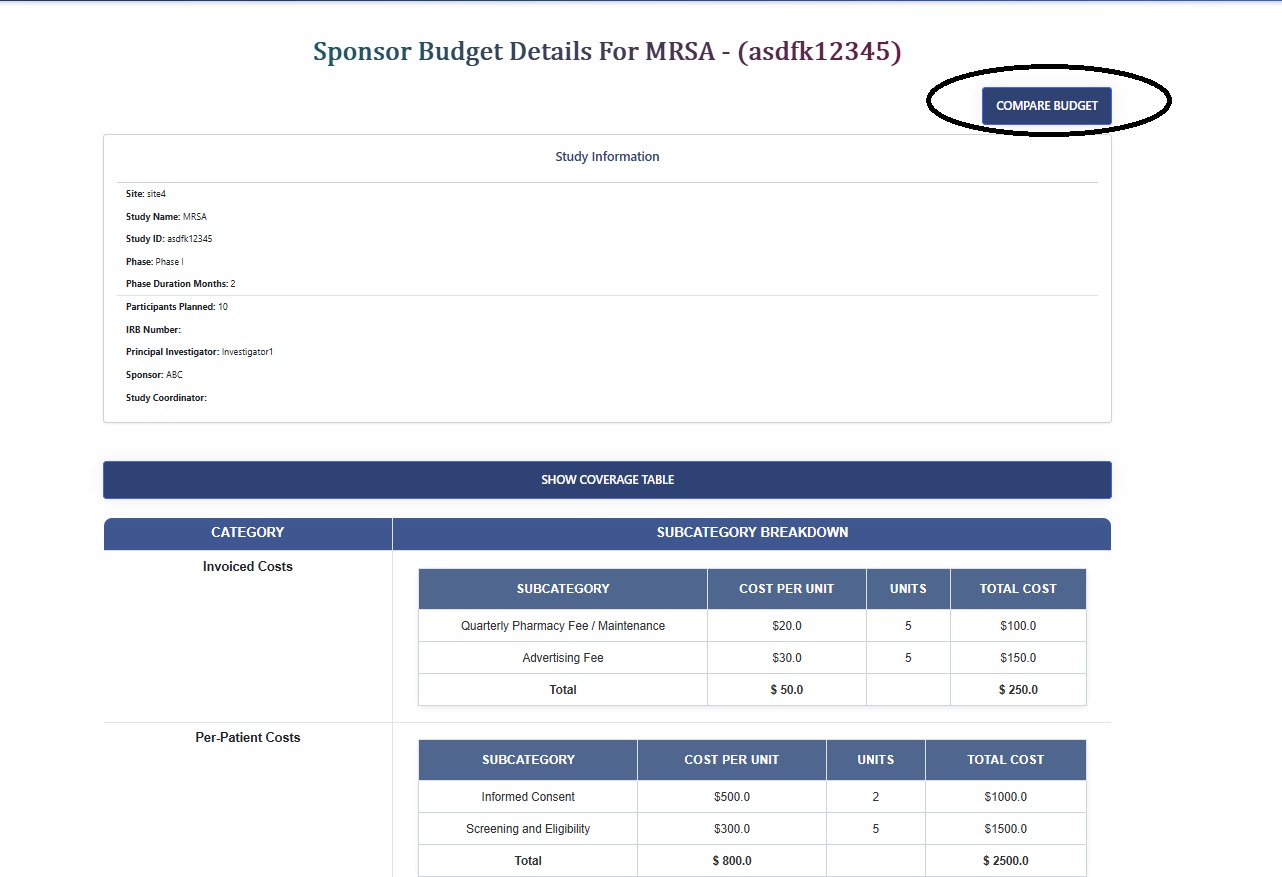
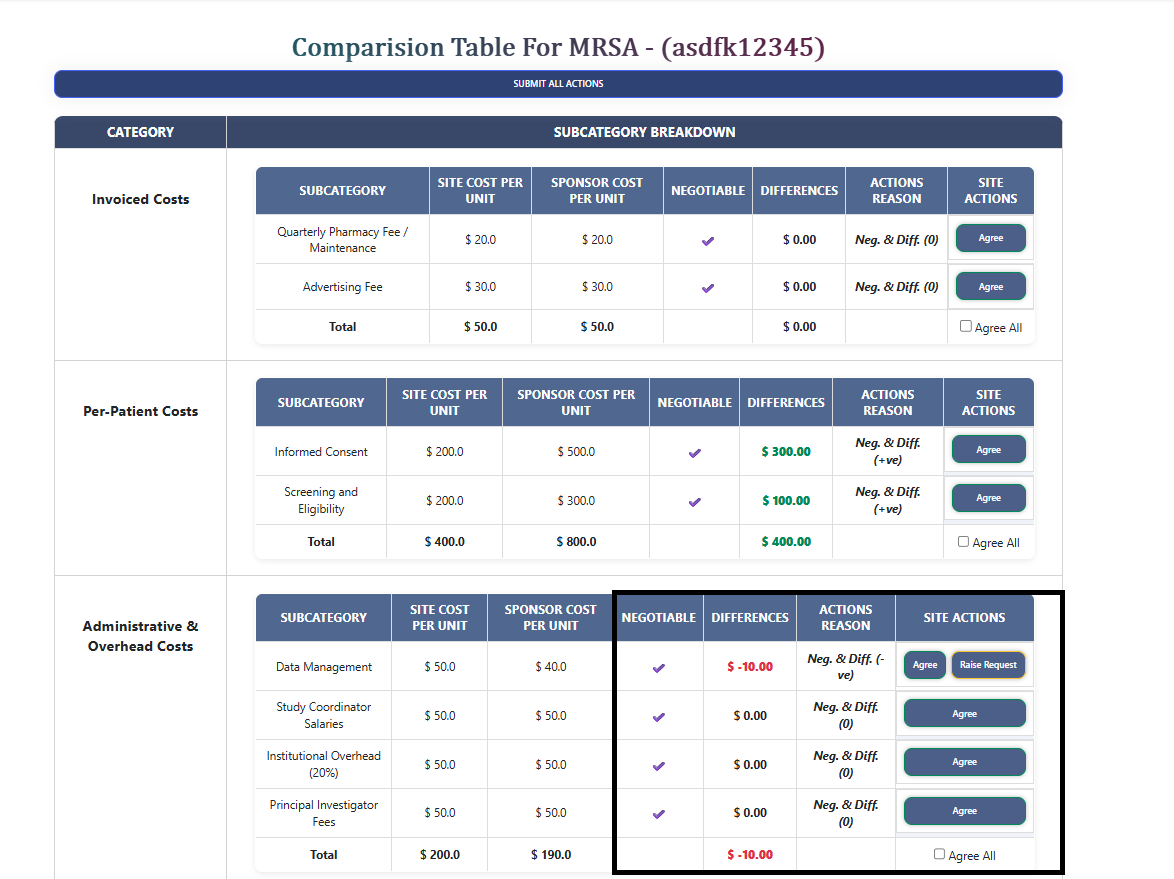
- 2 Click the "Compare Budget" button to see a side-by-side comparison of site budget vs. sponsor budget prices.
Take Actions on Budget Items
- 1 For each line item, choose to Agree with the price or Raise a Request for a different amount.
- 2 Available buttons depend on price differences and whether an item is negotiable.
- 3 After providing actions for all items, Submit all actions.
Sponsor Budget Review & Negotiation
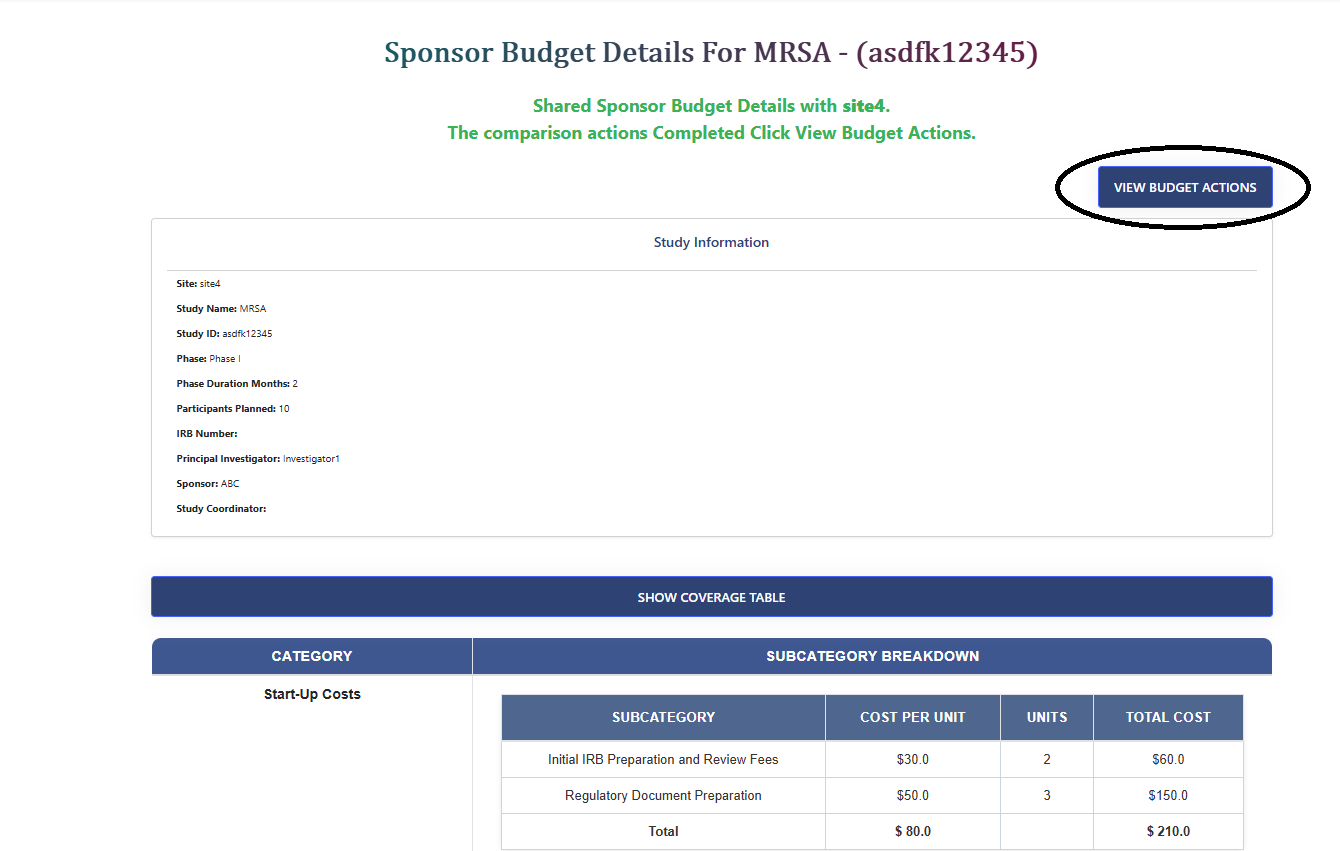
View Site Actions
- 1 Log in as Sponsor and click "Shared Sites".
- 2 Click "View Shared Budget".
- 3 Click "View Budget Actions" to review all actions taken by the Site Investigator.
Sponsor Response Actions
- 1 For each line item, the Sponsor may: Agree, Raise Request, or Reject.
- 2 Provide a response for every line item and then Submit all actions.
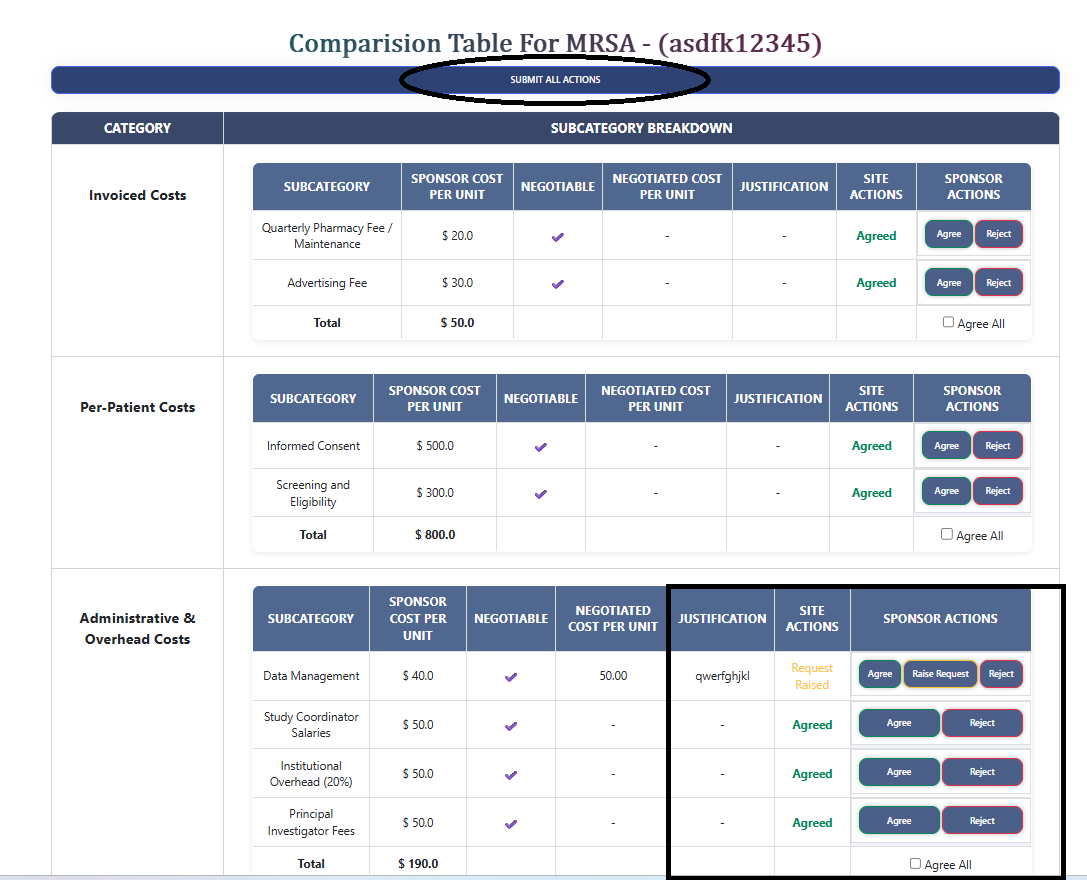
Negotiation Process
This process continues until both the Sponsor and the Site Investigator have agreed on a price for every line item. Both parties must agree on each item before the final budget can be generated.
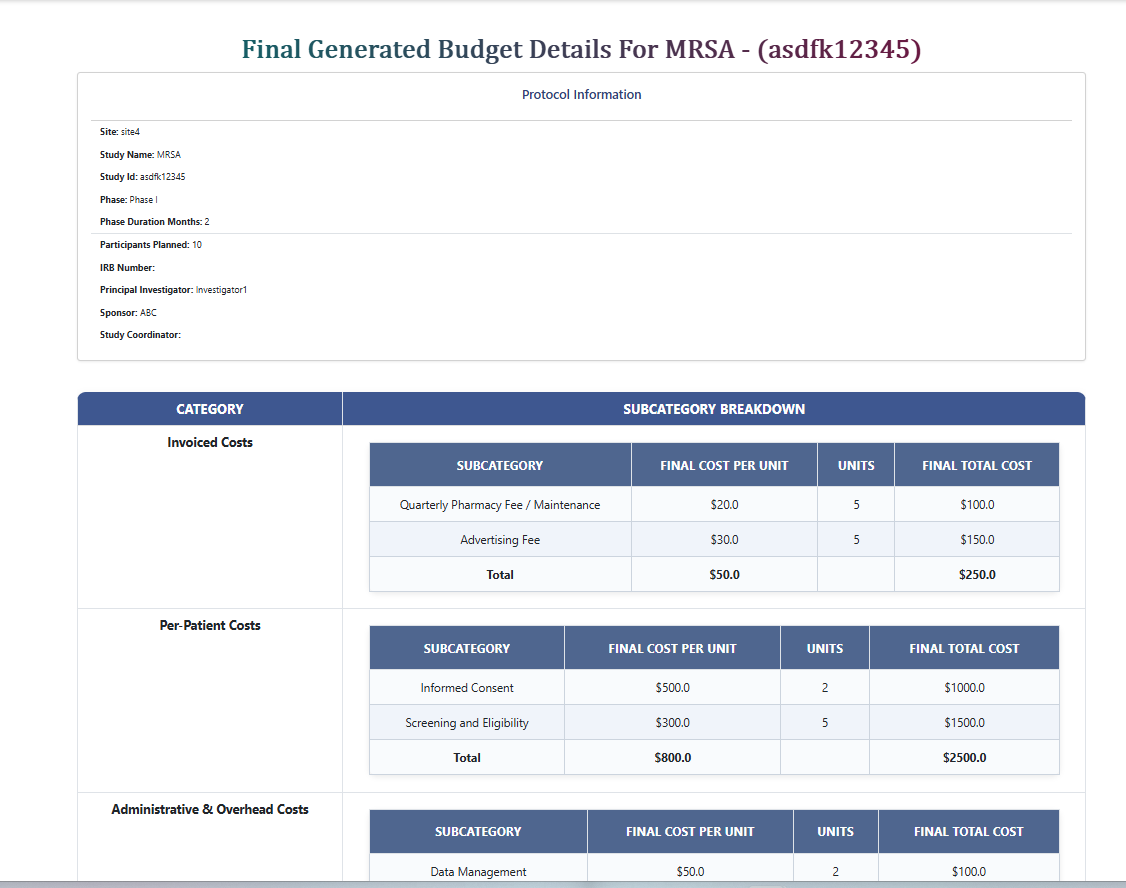
Final Budget Generation
Generate & Download Final Budget
Generate Final Budget
Click "Generate Final Budget" to produce the agreed-upon budget document.
.png)
View Final Budget
Click "View Final Budget" to access the finalized budget.
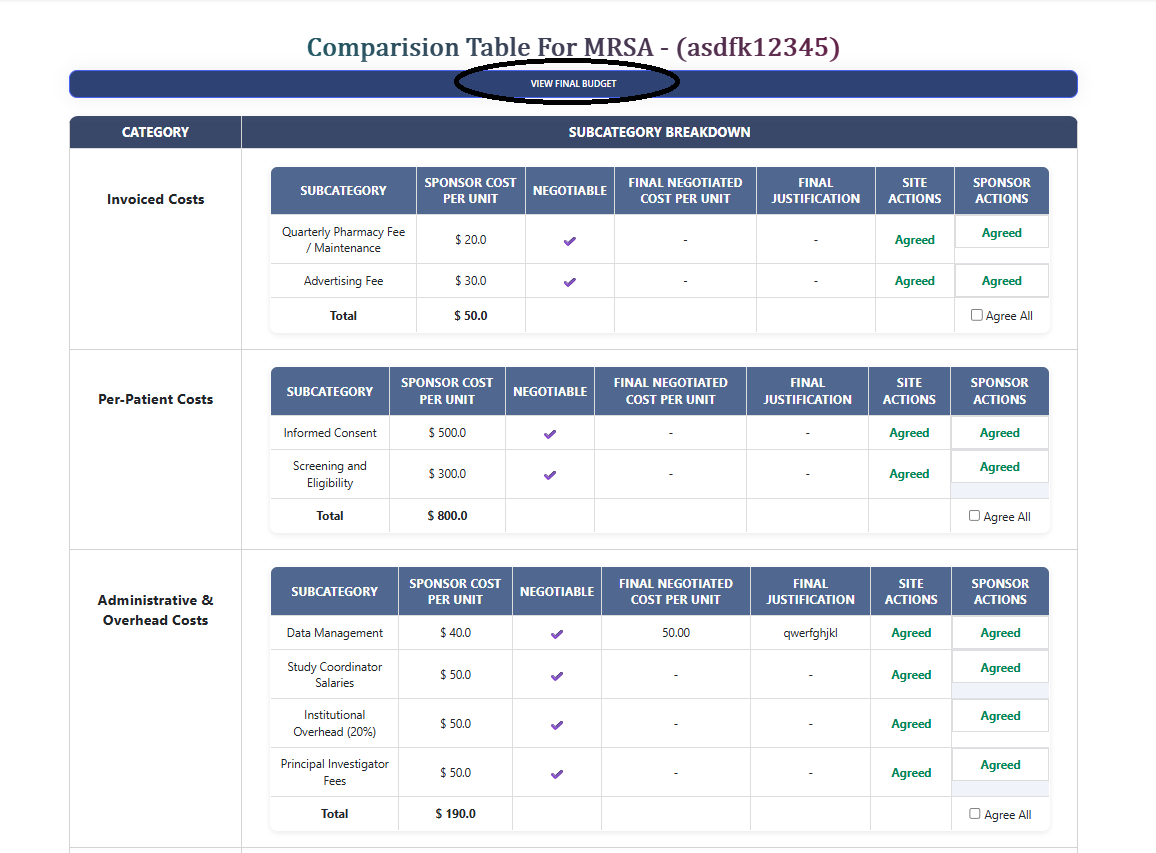
- ✓ The final budget can be downloaded by both parties for record-keeping and implementation.
.png)